
A digital mockup places your artwork onto a realistic image of a garment so buyers can see the finished product before it exists. That’s the whole idea. But not every mockup does the same job, and confusing the two types is where most custom apparel sellers get burned.
A marketing mockup is built for selling. It’s meant to look great on a listing page or Instagram post, and it doesn’t need to carry exact scale, color codes, or file layers. A production-ready proof is built for manufacturing. It shows precise placement, dimensions, color references, and file specs a decorator or factory can actually work from. Treat the first like a photo and the second like a blueprint.
The typical mockup lifecycle for a custom order runs through a few predictable stages:
- Design: finalize the artwork as vector or high-resolution raster files.
- Mockup: apply the design to a digital blank for visualization and sales.
- Proof: generate a production-accurate version with measurements and color specs.
- Sample: order a physical unit to confirm the proof translated correctly.
- Production: approve the sample and greenlight the full run.
Skip a step, especially the sample, and you risk finding out about a placement error after 50 hoodies are already printed.
Key Takeaways
Production-ready proofs and marketing mockups serve different purposes, and treating them as interchangeable is the leading cause of custom order delays and reprints.
| Point | Details |
|---|---|
| Two mockup types exist | Marketing mockups sell the product; production-ready proofs guide manufacturing with exact specs. |
| Vector files matter | Send AI, EPS, or PDF files for logos and text so decorators can scale without quality loss. |
| Color mode isn’t optional | Provide CMYK and Pantone references for print, since RGB screen colors don’t translate directly. |
| Consolidate revisions | Send all feedback in one message; each new round tends to restart the decorator’s review clock. |
| RNK Apparel Co. combines both stages | Its mockup and proof process is built specifically for hockey team orders with logos, names, and numbers. |
Table of Contents
- How does the digital mockup process work for custom orders?
- What are the steps in a custom order mockup workflow?
- Which tools should you use to create mockups?
- What file specs does a production-ready mockup need?
- How do mockups fit into POD platforms and manufacturer workflows?
- What do mockups, samples, and production actually cost?
- What mistakes cause the most mockup and production problems?
- How does RNK Apparel Co. handle mockups for a custom hockey order?
- What’s the real tradeoff between speed, cost, and accuracy?
- How can RNK Apparel Co. help with your next custom order?
- Where can you learn more about mockup tools and processes?
- Frequently asked questions about digital mockups for custom orders
- Sources
How does the digital mockup process work for custom orders?
Sellers need both types of mockups, and knowing which one to use at which stage saves real money. A marketing mockup gets a design in front of buyers fast. A production-ready proof is what a decorator or factory needs before they’ll cut fabric or fire up an embroidery machine.
Marketing mockups show off the emotional appeal of a product. They’re used on Shopify listings, Etsy pages, paid social ads, and email campaigns. Speed and visual polish matter more than exact accuracy here. If you’re selling a custom hockey jersey concept before you’ve locked the final artwork, a quick marketing mockup lets you gauge interest without committing to production costs.
Production-ready proofs work differently. They include exact placement measurements, correct scale relative to garment size, color mode information, and often layered files a decorator can open and adjust. Manufacturers need this level of detail because a “close enough” placement on a screen doesn’t guarantee a “close enough” placement on a heat press or embroidery frame. Workdepot’s guide to digital mockups notes that mockups are essential for checking placement and proportion before printing even starts, which is exactly the gap a marketing image doesn’t fill.
Here’s the decision guide: if you’re testing demand, running ads, or building a product listing, a marketing mockup is fine. If you’re about to send artwork to a decorator, sign off on a sample, or approve a bulk run, you need a production-ready proof with real specs attached.
Pro Tip: Never approve a bulk production run using only the mockup image from your online listing. Ask your decorator for a scaled proof with measurements before you say yes, even if the listing image looked perfect.
What are the steps in a custom order mockup workflow?
The process from initial idea to finished product follows a fairly consistent sequence, whether you’re working with a print-on-demand platform or a dedicated decorator.
- Gather the brief and assets. Collect the logo files, team colors, player names and numbers, garment style, sizes, and quantities before touching any design software.
- Place the design on a blank. Position the artwork on a digital garment template at roughly the right scale and location.
- Create the marketing mockup if you need one for pre-sales or social content.
- Build the production-ready proof. Add exact measurements, color references, and layer separation.
- Request a physical sample for anything beyond a small test order.
- Consolidate all revision requests into one message rather than several rounds of feedback.
- Approve and start production.
A solid buyer brief should specify the garment type, fabric weight, decoration placement, size run, colorways, total quantity, and the deadline. Missing any of these forces back-and-forth emails that stretch out the timeline.
Who handles what depends on your setup. A designer typically builds the artwork and initial mockup. The decorator or manufacturer converts that into a production proof and sometimes digitizes it for embroidery. The seller’s job is approving each stage and keeping communication tight.
| Step | Typical time range | Who’s usually involved |
|---|---|---|
| Brief and asset collection | 1 to 3 days | Seller |
| Design placement and marketing mockup | Hours to 2 days | Designer or seller |
| Production-ready proof | 1 to 5 business days | Decorator or manufacturer |
| Physical sample | 7 working days | Manufacturer |
| Revisions (consolidated) | 2 to 5 days | Seller and decorator |
| Bulk production | 1 to 3 weeks | Manufacturer |
Ready One’s ordering guide outlines a similar five-stage structure, brief, quote, sampling, bulk production, delivery, and reports sample lead times commonly running about one to two weeks with total lead times often lasting several weeks depending on order complexity.
Pro Tip: Send your decorator every revision request in a single message. Each new round of feedback tends to restart their review queue, which quietly adds days to your timeline.
Which tools should you use to create mockups?
Tool choice depends on what stage you’re at. Quick listing images call for something different than a manufacturing-grade proof.
Browser-based template tools like Canva and Adobe Express dominate the marketing mockup category because they require no design background. Canva’s Mockups feature analyzes uploaded photos to detect flat, simple surfaces ideal for product placement, which makes it fast for apparel flat-lays and lifestyle-style shots. Adobe Express offers templates, a Multiply blend mode for realistic fabric shading, and add-ons like Artboard Mockups and Mockuuups Studio for polished results without touching Photoshop.
Placeit and Mockuuups Studio sit in a similar bracket, both browser-based with large libraries of pre-shot apparel templates you drop artwork into. They’re strong for volume, generating dozens of listing variations quickly, but they’re not built for production sign-off.
Photoshop with smart objects remains the standard for sellers who need granular control. Envato’s print-on-demand mockup guide walks through the smart-object workflow: choose a mockup source, place the design, adjust scale, then export. This method gives you layer-level control that template tools can’t match, and it’s often what a decorator actually wants to see.
AI mockup generators have entered the space too, producing garment images from text prompts or reference photos. They’re useful for early concept visualization but shouldn’t replace a proper production proof.
Printify represents the POD integration category, where mockups generated on the platform link directly to manufacturing and fulfillment. RNK Apparel Co. operates differently: rather than a generic POD catalog, mockups feed directly into a specialized hockey apparel production process, with proof and sample steps built around team logos, player names, and numbering.
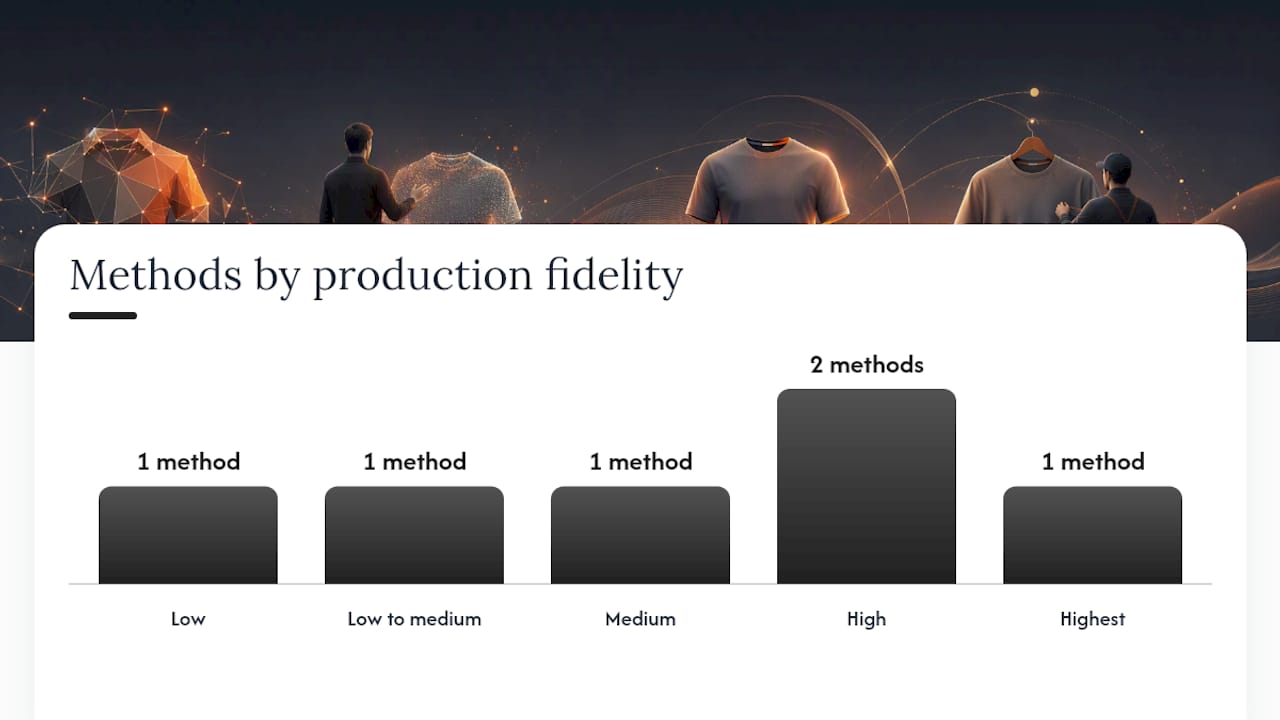
| Method | Speed | Cost | Production fidelity | Best use |
|---|---|---|---|---|
| Canva / Adobe Express | Very fast | Free to low cost | Low | Listings, social ads |
| Placeit / Mockuuups Studio | Fast | Subscription-based | Low to medium | Volume listing images |
| Photoshop smart objects | Moderate | Software cost | High | Design-to-decorator handoff |
| Printify platform mockups | Fast | Free with platform | Medium | POD store integration |
| RNK Apparel Co. proof and sample | Moderate | Included in order process | High | Team and custom hockey orders |
| Factory or sample-room photos | Slow | Sample cost | Highest | Final pre-production check |
Use browser tools for anything customer-facing. Use smart-object files or a manufacturer’s proof process for anything that touches a cutting table or embroidery machine.
What file specs does a production-ready mockup need?
A decorator can’t work from a JPEG screenshot of your Canva design. Production files need to meet specific technical standards, and getting this wrong is the single biggest cause of delayed custom orders.
Vector formats, AI, EPS, or PDF, are what printers expect for logos and text, since vector art scales to any size without losing quality. For raster elements like photographs or complex gradients, supply PNG files at 300 DPI or higher with a transparent background. If a decorator specifically requests it, send a layered PSD so they can isolate and adjust individual elements.
Color mode matters just as much as resolution. Digital screens use RGB, but most physical printing runs on CMYK, and the two don’t translate one-to-one. For screen printing especially, provide Pantone (PMS) color references rather than relying on how a color looks on your monitor. A “team red” that looks right in RGB can print noticeably off without a PMS number attached.
Placement dimensions need to be stated in inches or millimeters, not just visually approximated. Specify distance from seams, hems, or collar edges, and where possible, use a mockup overlay with ruler lines or measurement markers so there’s no ambiguity about scale.
| Decoration type | File format | Color mode | Resolution/detail | Notes |
|---|---|---|---|---|
| Screen printing | AI, EPS, or PDF (vector preferred) | CMYK with PMS reference | Vector or 300+ DPI | Simplify small text; avoid gradients |
| DTG (direct-to-garment) | PNG, transparent background | RGB acceptable | 300+ DPI minimum | Works well with photographic detail |
| Embroidery | AI or EPS, plus digitized file | N/A (thread colors) | Vector, simplified shapes | Requires stitch-count and digitizing step |
| Sublimation | PNG or PDF, full bleed | RGB | 300+ DPI | Design must cover full print area |
Embroidery deserves special attention because stitch count drives both cost and turnaround. Fabrikn’s guide to requesting embroidery mockups points out that a small chest mark might run several thousand stitches, while a full-back graphic can involve tens of thousands of stitches. Specifying garment weight, embroidery size, and stitch style upfront gets you a more accurate quote and avoids surprise costs later.
Pro Tip: Convert fonts to outlines before sending files, and flatten or clearly label hidden layers. A decorator opening a file full of unlabeled layers or missing fonts will bounce it back to you, costing a full turnaround cycle.
How do mockups fit into POD platforms and manufacturer workflows?
Getting a mockup from your design software into an actual finished product requires a few concrete handoffs, whether you’re using a print-on-demand platform or working directly with a manufacturer.
On a POD platform, the process usually looks like this:
- Upload your artwork file to the platform’s design tool.
- Choose the product blank (garment style, color, size range).
- Review the platform-generated mockup for placement and color accuracy.
- Order a physical sample if the platform allows it.
- Publish the listing once the sample confirms quality.
Working with a manufacturer or decorator directly follows a similar arc but with more manual communication:
- Submit your brief along with the mockup and any production files.
- Expect feedback on placement feasibility, color matching, and garment compatibility.
- Request a physical sample for any order beyond a handful of units.
- Confirm final approval before the bulk run begins.
Before signing off on any mockup, run through a quick verification: does the color match your intended reference (not just how it looks on-screen), is the scale correct relative to garment size, does the garment color in the mockup match what you’re actually ordering, and are edge details (stitching, seams, trim) accounted for?
Some platforms, Printify among them, support direct store publishing, where a mockup automatically syncs to your Shopify or Etsy listing. That’s convenient for speed but worth double-checking against a physical sample before a large batch ships. Manual handoffs, common when working with a specialized decorator, take longer but generally produce higher fidelity for detailed custom work like team logo placement on jerseys.
What do mockups, samples, and production actually cost?
Budgeting for a custom order means accounting for several separate cost categories, not just the price per garment.
Tool subscriptions run modest: Canva and Adobe Express both have free tiers with paid plans typically in the range of a basic monthly subscription, while Placeit and similar mockup libraries charge their own subscription fee. Digitizing fees apply specifically to embroidery, where converting artwork into a stitch file adds a setup cost on top of the per-unit decoration charge. Sample costs vary depending on garment and decoration complexity, and shipping adds to both the sample and the bulk order.
MFG Merch’s process includes a free photorealistic mockup at the quoting stage along with unlimited revisions, with a full order timeline typically spanning several weeks from quote to delivery for standard print runs. That’s a useful benchmark: if a decorator quotes you a full turnaround under a week for a bulk order, ask what corners are being cut.
A few ways to keep both cost and time under control:
- Write a complete brief the first time instead of trickling in details over several emails.
- Reuse existing mockup templates and blanks across similar products instead of rebuilding from scratch.
- Consolidate every revision request into one round rather than several small ones.
- Confirm garment specs (weight, fit, color) before ordering a sample, not after.
What mistakes cause the most mockup and production problems?
The same handful of errors show up again and again in custom order disputes, and nearly all of them are preventable with one extra check before hitting “approve.”
Using low-resolution artwork tops the list. A logo pulled from a website at 72 DPI looks fine on-screen but turns blurry or pixelated once scaled up for a full-back print. Relying on a marketing mockup for production sign-off is the second most common mistake, and it’s the one that causes the most expensive surprises, since marketing images often skip the exact scale and placement data a decorator needs.
Other frequent errors: submitting files in RGB when the decorator needs CMYK with PMS references, forgetting to include vector versions of small text or fine details that don’t hold up as raster images, and skipping placement measurements entirely in favor of “just center it.”
A fast way to check any mockup before sending it forward: shrink it to thumbnail size and see if the design still reads clearly. Check how it looks scaled across your smallest and largest garment sizes, since a design centered perfectly on a medium can shift oddly on an extra-large. And test contrast, particularly for light-colored logos on dark fabric, where a mockup rendered on a white background can hide a legibility problem that only shows up once printed.
Quick fixes exist for most of these: re-export raster art at higher resolution, convert flat colors to vector where possible, and ask your decorator for a quick digitizing proof before committing to a full embroidery run. Before final approval, run through one more pass: correct file format, correct color mode, placement measurements included, and a sample reviewed in person or via clear photos, not just a rendered mockup.
How does RNK Apparel Co. handle mockups for a custom hockey order?
A typical custom hockey team order at RNK Apparel Co. starts with the basics: garment style, team colors, logo files, and the roster of names and numbers. From there, the process moves through a few clear stages.
- The buyer submits team logo artwork, color specifications, and player details (names, numbers, sizes).
- RNK’s team builds a digital mockup showing logo placement, colors, and personalization on the selected garment.
- The buyer reviews the mockup for accuracy, checking name spelling, number placement, and color match against team branding.
- Revisions are consolidated into a single round of feedback whenever possible.
- Once approved, the order moves into production with sizes and quantities locked in.
A checklist a coach or team manager can expect to work through includes: logo file confirmed as high resolution or vector, exact colors specified (not just “team blue”), size chart matched to each player’s roster, and personalization details (names and numbers) double-checked for spelling before final sign-off. Guidance on logo prep is covered in more depth in RNK’s guide to getting your team logo on custom apparel, and the specifics of order flow and approval stages are detailed in how team apparel orders are processed.
The sign-off structure is straightforward: the buyer approves the mockup, RNK confirms production feasibility, and the buyer gives final approval before the run begins. Timelines for mockup turnaround and production vary by order size and personalization complexity, similar to the ranges seen across the custom apparel industry more broadly.
Author Eric, who covers custom apparel production workflows for this site, has traced these steps across multiple team order cycles, and the pattern holds regardless of garment type: clear specs at the start save time at every later stage.
What’s the real tradeoff between speed, cost, and accuracy?
Every seller wants mockups that are fast, cheap, and production-accurate. In practice, you get to pick two.
Marketing mockups built in Canva or Adobe Express are fast and cheap, but they’re not accurate enough to hand to a decorator without a follow-up proof. Production-ready proofs are accurate but take longer and sometimes cost more, especially when digitizing or manual layout work is involved. Trying to skip the proof stage to save a few days is the most common false economy I see in custom apparel: the time saved upfront gets eaten many times over if a bulk run has to be reprinted.
Small sellers juggling both online listings and physical sample approval tend to do best with a standardized system rather than improvising each order. A simple brief template, garment type, colors, logo files, placement notes, deadline, cuts email back-and-forth dramatically. Keep one master mockup file you can adjust rather than rebuilding from scratch for every new colorway or team.
If there’s one habit worth adopting immediately, it’s this: never let a marketing mockup double as your final approval document. Build the habit of asking for (or creating) a measured, color-referenced proof before any bulk order, even a small one. It costs a day. Skipping it can cost a reprint.
How can RNK Apparel Co. help with your next custom order?
If you’ve been piecing together mockups in Canva and hoping they translate cleanly to production, there’s a more direct path. RNK Apparel Co. builds the mockup and production proof as one connected process, specifically for hockey team and individual orders, so you’re not guessing whether a listing image will hold up once it hits a decorator’s table.
Here’s what that looks like in practice:
- You submit your team logo, colors, and player roster, and RNK generates a mockup that shows real placement and color accuracy from the start.
- Sample options are available before committing to a full team order, so you can physically check quality before locking in quantities.
- Personalization, names, numbers, sizing across a full roster, is built into the approval process rather than handled as an afterthought.
Because the mockup and the production file come from the same workflow, you avoid the classic disconnect between what a listing image promises and what a decorator can actually deliver. That’s the exact gap this article has spent most of its length warning you about.
Ready to see it for a specific product? Browse the custom hockey t-shirt collection to start a mockup for your team, or check the custom hockey hoodie lineup if you’re outfitting a team for colder-weather practices.
Where can you learn more about mockup tools and processes?
- Adobe Express’s mockup guide covers blend-mode techniques and add-ons for quick, polished apparel mockups.
- Canva’s Mockup Help Center explains how its surface-detection feature works and what makes a photo suitable for mockup placement.
- Envato’s print-on-demand mockup primer walks through PSD smart-object workflows for sellers who want full design control.
- Ready One’s ordering guide breaks down factory-level lead times and MOQ expectations for bulk custom clothing runs.
- MFG Merch’s process overview shows what a typical quote-to-delivery timeline looks like for standard merchandise runs.
- Wallfully’s guide to previewing custom prints offers additional file-prep tips useful before sending artwork to any decorator.
Frequently asked questions about digital mockups for custom orders
Do I need a production-ready proof for small orders too? Yes, even a five-unit order benefits from a measured proof. Placement errors don’t scale down just because the order is small, and reprinting five shirts still costs time and materials.
Can I use a Canva mockup as my final approval before production? Not on its own. Canva mockups are excellent for listings and marketing, but they typically lack the exact scale and color-mode data a decorator needs for production sign-off.
How long does it usually take to go from mockup to finished product? POD orders can move faster since sampling is optional in some cases.
What’s the biggest mistake sellers make with mockup files? Sending low-resolution raster art without a vector backup. It looks fine on a screen but falls apart once a decorator scales it up for printing or embroidery.
Who owns the rights to a mockup I create? Mockup images generated through tools like Canva are typically royalty-free for personal and commercial use once you’ve applied your own artwork, but you should always confirm you have rights to the underlying design elements (fonts, graphics, team logos) before using them commercially.
Sources
- Generate professional mockups with Adobe Express
- Mockup design - Canva Help Center
- How to Order Custom Clothing | Ready One Guide
- Print on demand mockups: how to use them to improve your listings
