
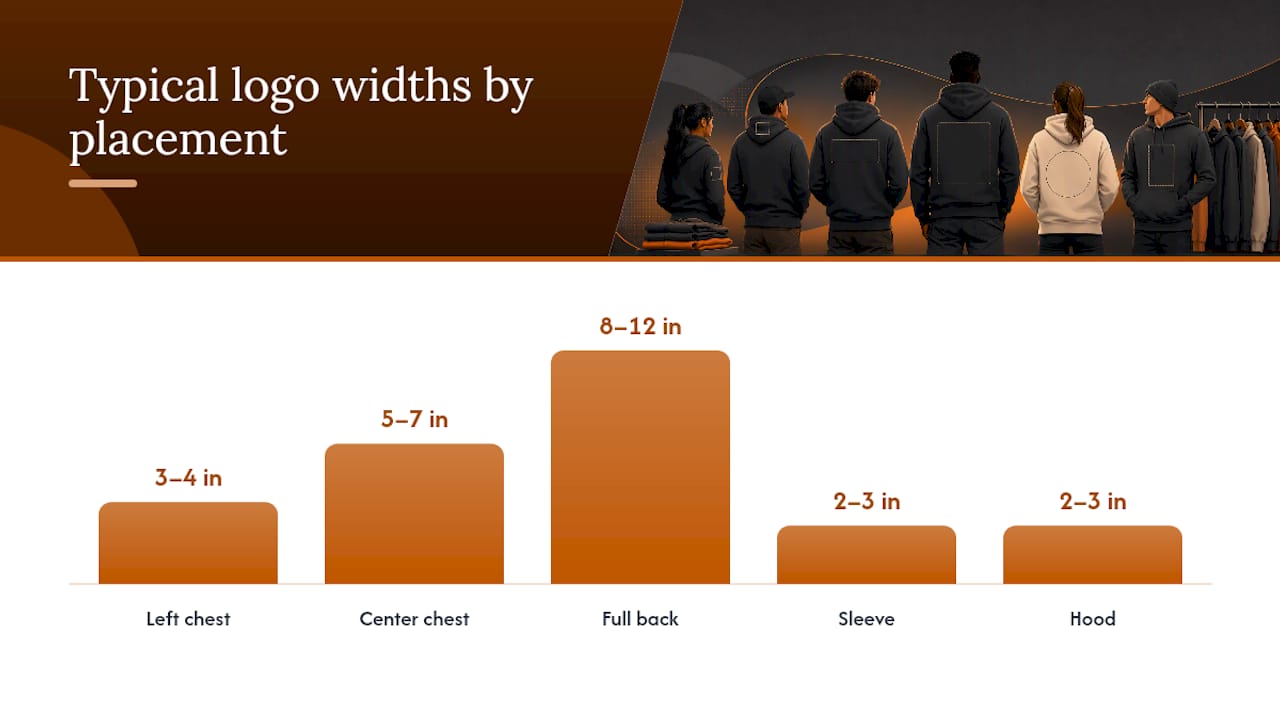
Left chest logos typically run around 3 to 4 inches wide, center chest generally measures about 5 to 7 inches, full-back graphics are usually sized near 8 to 12 inches, and sleeve or hood accents tend to be small, about 2 to 3 inches. For most team hoodies, the safest combo is a modest left-chest mark paired with a bigger back design. Scale everything up or down based on garment size and how you’re decorating it.
TL;DR:
- Logos on the left chest should typically be 3 to 4 inches wide, while full-back graphics are best kept between 8 and 12 inches for clear readability.
- Center chest designs can range from 5 to 7 inches but may extend to 8 inches on oversized hoodies without appearing crowded.
- Embroidery requires a minimum size of about 2 to 2.5 inches to retain detail, whereas print methods can handle smaller logos around 1 inch in size.
- Garment-specific factors like pocket seams or zippers influence placement and size adjustments to avoid distortions or crowding.
- Scaling logos for youth or oversized hoodies should be proportional, reducing size by 20 to 30 percent for youth, and tailoring the design to maintain legibility across sizes.
Table of Contents
- Quick Shortlist: Recommended Placements and Sizes
- Sizing Guidelines by Placement (and the Exceptions That Matter)
- Embroidery vs. Print: How the Decoration Method Changes Your Size Options
- How to Measure and Place a Logo on a Hoodie
- Scaling Logo Size for Youth, Adult, and Oversized Hoodies
- Mockup and Proofing Checklist Before You Order
- RNK Apparel: Experience Applying These Rules to Team Hoodies
- Balancing Visibility and Wearability for Different Team Roles
- How Rnkapparel Can Help With Your Next Team Order
- Sources
- FAQ
Quick Shortlist: Recommended Placements and Sizes
Every team hoodie order starts with the same question: where does the logo go, and how big should it be? The size ranges below come from what actually prints well and reads clearly across a crowd of players, not just what looks good on one flat mockup.
- Left chest, 3 to 4 inches: the default for a team wordmark or crest. It reads as professional, doesn’t compete with a jersey number underneath, and works whether the wearer is standing still on the bench or moving through a lobby.
- Center chest, 5 to 7 inches: a bolder statement piece, common on fan gear and pullover hoodies without a front pocket getting in the way.
- Full back, 8 to 12 inches: the go-to for team names, mascots, or anything meant to be read from 20 feet away. This is where visibility wins over subtlety.
- Sleeve or hood accents, 2 to 3 inches: small marks, sponsor logos, or a secondary icon that adds detail without overwhelming the garment.
The combo most teams land on is a small left-chest logo up front and a larger graphic on the back. It keeps the front understated for everyday wear while making the team unmistakable from behind at a rink, a tailgate, or a school hallway. That layout also happens to be the easiest one to scale consistently across a roster full of different body sizes.
Sizing Guidelines by Placement (and the Exceptions That Matter)
The ranges above are starting points, not fixed rules. A wide, horizontal wordmark and a tall, narrow crest fill the same “3 to 4 inch” left-chest slot very differently, so width and height both matter, not just one dimension.
| Placement | Typical size | Best for | Common exception |
|---|---|---|---|
| Left chest | 3–4 in wide | Team wordmark, small crest | Long wordmarks may need 4–4.5 in wide but under 2 in tall |
| Center chest | 5–7 in wide | Bold graphics, no front pocket | Oversized hoodies can push toward 7–8 in without crowding |
| Full back | 8–12 in wide | Team name, mascot, event graphics | Tall mascots may run 10–12 in high but narrower in width |
| Sleeve | 2–3 in | Sponsor mark, secondary icon | Zip hoodies often need a shorter, wider sleeve shape to clear the seam |
| Hood | 2–3 in | Accent detail, small crest | Rarely used alone; usually paired with a chest mark |
Aspect ratio changes everything here. A circular crest at 3.5 inches fills a left-chest space evenly, but a wordmark that’s twice as wide as it is tall needs to be measured by width first, then checked for height so it doesn’t shrink into an unreadable strip. Oversized and boxy hoodie fits can absorb a bigger center-chest print without looking cluttered, while slim or fitted hoodies need the logo pulled down a size or two so it doesn’t stretch or distort across the chest.
Pocketed hoodies cut into your usable left-chest space, and zip-up styles split the center chest down the middle, which rules out most single-piece center prints entirely. When in doubt, size down rather than up. A logo that’s slightly smaller than the maximum still reads clean; one that’s pushed past the garment’s natural boundaries looks stretched the moment someone moves their arm.
Embroidery vs. Print: How the Decoration Method Changes Your Size Options
Embroidery and print aren’t interchangeable at the same size. Stitching has a floor. Below roughly an inch of detail width, fine lines and small text start closing up into a solid blob of thread instead of staying legible. That’s why most embroidered left-chest logos simplify a full-color crest down to two or three thread colors and drop tiny text altogether.
Print methods (screen print or DTG) handle fine detail and gradients far better, but they have their own limits around bleed and edge crispness, especially on placements near a seam or hood zipper where the fabric isn’t flat.
- Embroidery minimum: generally around 2 to 2.5 inches needed for fine detail or small text to remain readable.
- Embroidery maximum: size is usually limited by cost and stitch count rather than technical constraints; large full-back embroidery can become costly and heavy.
- Print minimum: can be smaller than embroidery, potentially down to about an inch, as ink doesn’t have thread-width limitations.
- Print maximum: primarily limited by garment width and potential bleed near seams, rather than by the printing technique itself.
Pro Tip: If your crest has thin lettering or a lot of small detail, ask for a simplified version before committing to embroidery. A patch supplier or embroidery partner like Lee Embroidery can often tell you in one look whether your artwork will hold up at small sizes.
How to Measure and Place a Logo on a Hoodie
Every decorator works off the same reference point: HPS, or high point shoulder, which is the seam where the shoulder meets the collar. Everything else gets measured down or across from there, so getting this one number right keeps your whole order consistent.
- Find the HPS. This is the highest point of the shoulder seam, on either side of the collar.
- Measure down for chest placement. Left-chest logos are typically centered about 7 to 8 inches down from the HPS, adjusted slightly for garment size.
- Set the centerline. For left-chest placement, the logo center usually sits 3.5 to 4 inches from the garment’s true center, not the wearer’s actual chest center.
- Check for obstacles. Pockets, zippers, and drawstring grommets all shift the usable print area. Confirm actual clearance on the specific hoodie style before finalizing size.
- Leave clear space. Keep at least a quarter inch of buffer around the artwork so it doesn’t crowd a seam or fold when the hoodie is worn.
- Send proper files. Vector files (AI, EPS, or PDF) work best for both print and embroidery digitizing. If you only have a raster image, it needs to be at least 300 dpi at the intended print size, in CMYK or RGB depending on what your decorator requests.
Following a template-based placement guide rather than eyeballing it saves a lot of reprint headaches, especially when you’re ordering across multiple garment sizes at once.
Scaling Logo Size for Youth, Adult, and Oversized Hoodies
A logo sized for an adult XL will overwhelm a youth medium. Most guides recommend scaling youth logos down by about 20 to 30 percent from the adult version to keep proportion intact rather than just shrinking to fit.
- Youth S to XL: left chest around 2.5 to 3 inches, full back around 6 to 8 inches.
- Adult S to XXL: left chest around 3 to 4 inches, full back around 8 to 12 inches.
- Oversized or boxy fits: center chest can push toward the top of the 5 to 7 inch range without crowding, since there’s more flat surface to work with.
- Mixed team orders (youth and adult together): set two size tiers rather than one universal size, and confirm both against actual HPS measurements rather than assuming a linear scale-down.
The goal across every size in the order is legibility, not uniformity. A crest that reads clearly at 2.5 inches on a youth small and 4 inches on an adult XXL looks more consistent as a team, even though the literal dimensions differ.
Mockup and Proofing Checklist Before You Order
Numbers on a spec sheet don’t always translate the way you expect once they’re on fabric. A short proofing pass catches problems a size chart alone will miss.
- Scale the mockup to the actual garment dimensions, not a generic template.
- Confirm HPS measurement and centerline offset match what you specified.
- Request a stitched sample or a high-resolution mockup, not just a flat digital rendering.
- Ask for a color proof against Pantone or CMYK values, especially if the logo uses a brand-specific color.
- For embroidery, ask for a stitch-count estimate. It affects both cost and how fine the detail can actually render.
- Check clear space around pockets, zippers, and seams one more time before signing off.
Pro Tip: Ask to see the logo proof at 3.5 x 3.5 inches specifically if that’s your intended left-chest size. It’s the most commonly cited target for a reason: it fits standard chest widths without looking small or crowding a zipper.
RNK Apparel: Experience Applying These Rules to Team Hoodies
Some hockey team hoodies feature a left-chest crest, back number, and sponsor sleeve mark designed to work together on the same garment without fighting for space. A common combination is a 3 to 4 inch left-chest team mark paired with a larger back graphic for arena and travel gear.
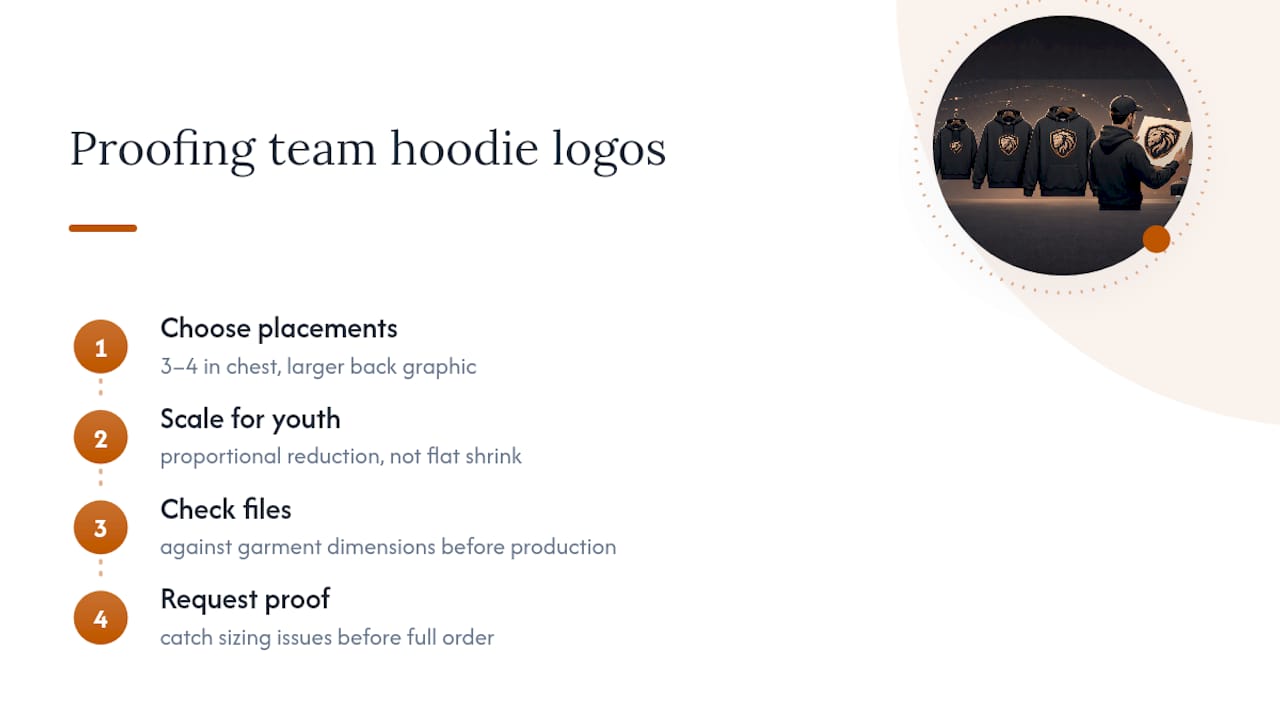
Scaling for youth sizes is often handled with proportional reductions rather than a flat shrink, and files are typically checked against garment dimensions before printing or embroidery. Teams working through logo upload and setup can request a proof before committing to a full team order, which catches sizing issues before 20 hoodies come back wrong.
Balancing Visibility and Wearability for Different Team Roles
Coaches and staff hoodies usually favor the smaller, subtler left-chest mark. It reads as professional without turning the wearer into a walking billboard. Fan gear and event hoodies flip that logic, leaning on a bold full-back graphic meant to be spotted across a rink or parking lot.
The trade-off is straightforward: bigger prints cost more and add stiffness to the fabric, while smaller ones stay light and flexible but lose punch from a distance. When you’re not sure which way to go, default to the left-chest-plus-back combo. It covers both needs at once.
How Rnkapparel Can Help With Your Next Team Order
Some custom hockey hoodies are built with sizing logic similar to that covered in this guide incorporated into the ordering process. Customers typically upload their team logo, choose a garment style, and can request a proof before production starts to confirm placement and size.
That proof step matters more than most teams realize. A mockup on screen can look right at any size, but a scaled proof against the actual garment dimensions is what catches a crest that’s too tall for the chest panel or a back graphic that crowds the collar. This quality check is often included as part of the ordering process.
Beyond hoodies, the same sizing principles apply to hockey graphic t-shirts and other team apparel, so a roster order can stay consistent across garment types. Youth sizing in orders is often scaled using a 20 to 30 percent reduction rather than a generic shrink setting. It is common to start a design and request a proof through team hoodie options to see how the logo will look before committing to a full order.
Sources
- Hoodie logo placement guide: Best logo positions and sizes
- Where to Print on a Hoodie: Placement & Sizing Guide | YAYA Prints
- Hoodie Print Placement Guide: Size Chart and Pro Tips - Fresh Prints Supply Co
FAQ
What size should a logo be on a hoodie?
Left chest logos typically run 3 to 4 inches wide, center chest logos run 5 to 7 inches, and full-back graphics run 8 to 12 inches, depending on the garment size and decoration method.
What is a typical logo size on a name-brand hoodie?
Major brands commonly use a small left-chest mark around 3 to 4 inches, which lines up with the same range recommended for most team hoodie orders.
What size should I use for a logo?
Start with the placement: 3 to 4 inches for left chest, 5 to 7 for center chest, 8 to 12 for full back, and 2 to 3 inches for sleeve or hood accents, then adjust for garment fit and artwork shape.
Where should a logo go on a hoodie?
Left chest is the most common spot for a team identifier, while full back is the standard choice when visibility from a distance matters more than subtlety. Many teams combine both on a single hoodie for the best of each.
Does embroidery change the recommended logo size?
Yes. Embroidery generally needs a minimum size around 2 to 2.5 inches to keep fine detail and small text legible, while print methods can go smaller without losing clarity.
