

The fastest way to organize end-of-season team merchandise is a six-step plan: triage items into four piles, log everything in a spreadsheet, clean and repair what you’re keeping or selling, store it correctly, assign each item an exit path, and prevent the problem next season with an on-demand team store.
Start within 24 hours by clearing a workspace, grabbing four labeled boxes (Keep, Repair, Sell/Donate, Trash), and pulling all gear into one room.
Your end-of-season checklist:
- Set up a triage station with boxes, labels, and gloves
- Sort every item into one of four categories
- Photograph and log each item in a shared spreadsheet
- Clean and repair before storing or listing for sale
- Assign a disposition path with a hard deadline
- Pilot an on-demand store to prevent leftovers next season
Key Takeaways
A six-step plan covering triage, inventory, cleaning, storage, disposition, and on-demand prevention is the most reliable way to manage end-of-season team merchandise without losing money or keepsakes.
| Point | Details |
|---|---|
| Triage within 72 hours | Sort into four piles immediately after the final game to prevent damage and decision drift. |
| Log everything in a spreadsheet | Track item type, size, condition, photo, and disposition path in a shared Google Sheet. |
| Assign exit paths with deadlines | List for sale within 2–6 weeks; donate unsold items after 8 weeks to clear inventory. |
| Protect keepsakes properly | Use acid-free tissue and garment bags for autographed or sentimental items; document provenance in writing. |
| Rnkapparel for next season | Custom on-demand orders through Rnkapparel eliminate leftover inventory by producing only what players actually order. |
Table of Contents
- How to organize end-of-season team merchandise in the first 72 hours
- Building your end-of-season inventory record
- Cleaning and repairing gear before storage or sale
- Which storage method actually protects your gear
- How to choose the right exit path for each item
- Why on-demand team stores prevent this problem next season
- Your 6-week end-of-season workflow
- What most coaches get wrong about end-of-season gear
- How Rnkapparel supports your team store and reorder needs
- Sources
How to organize end-of-season team merchandise in the first 72 hours
Speed matters here. The longer gear sits in a pile, the more likely it is to get damaged, lost, or forgotten. Set up your triage station before you do anything else: a clear table or floor space, four labeled bins or boxes, a marker, and a pair of disposable gloves for handling used pads and helmets.
The four piles:
- Keep — required uniforms, team-owned gear, items with carry-forward value
- Repair — loose seams, missing snaps, broken zippers that are worth fixing
- Sell or Donate — clean, wearable items no longer needed by the team
- Trash — structurally compromised safety gear (cracked helmet shells, torn padding) that cannot be resold or donated legally
One rule that saves time: any protective gear with a visible structural failure goes straight to Trash, no debate. Helmets with cracked shells, pads with broken frames, and skate boots with compromised ankle support are a liability if passed on, even for free.
72-hour task list:
- Gather all gear from lockers, storage rooms, and parent cars into one location
- Sort every item using the four-pile system above
- Photograph each item in the Sell/Donate pile before it moves
- Bag and label the Trash pile for disposal
- Set the Repair pile aside with a note on what each item needs
- Lock or seal the Keep pile so nothing migrates back into the chaos
Pro Tip: Recruit two or three parent volunteers for the initial sort. Assign one person to photograph, one to label, and one to call out conditions aloud. A three-person crew can triage a full season’s worth of gear in under two hours.
Building your end-of-season inventory record
A spreadsheet with eight columns is all you need. No specialized software, no subscription. Open Google Sheets, create a new file, and share it with your coach, treasurer, and parent rep before you start entering data.
Essential columns:
- Item Type — jersey, hoodie, bag, helmet, etc.
- Size — XS through 3XL, or youth sizing
- Player Name/Number — only for personalized items
- Condition — New, Good, Repair Needed, or Toss
- Quantity — how many of this exact item you have
- Photo Link — paste a Google Drive or Dropbox URL
- Suggested Disposition — Keep, Sell, Donate, or Discard
- Suggested Price — leave blank for donations and discards
Example row:
For photos, use your phone and shoot in natural light against a plain background. In Google Sheets, paste the shareable link directly into the Photo Link cell. For larger clubs managing multiple teams, replacing ad-hoc spreadsheets with a centralized tool can reduce errors and make it easier to share data across coordinators.
Store the master file in a shared Google Drive folder, not on anyone’s personal laptop. Give the coach, treasurer, and one parent rep edit access. Everyone else gets view-only.
Cleaning and repairing gear before storage or sale
Nothing kills a resale faster than a jersey that smells like a locker room. Clean everything before it goes into storage or onto a sale table, and do it by material.
Material-by-material guide:
- Synthetic jerseys and performance tees — machine wash cold, gentle cycle, no fabric softener (it degrades moisture-wicking fibers). Hang dry only; a dryer shrinks polyester blends and cracks heat-pressed numbers.
- Cotton hoodies and sweatshirts — machine wash warm, tumble dry low. Check for embroidered patches before washing; loose threads catch in agitators.
- Embroidered patches and twill lettering — turn the garment inside out before washing to protect the stitching. Never iron directly over embroidery.
- Leather or synthetic gloves — wipe with a damp cloth and a small amount of mild soap. Never submerge in water; it warps the palm padding and dries out the leather.
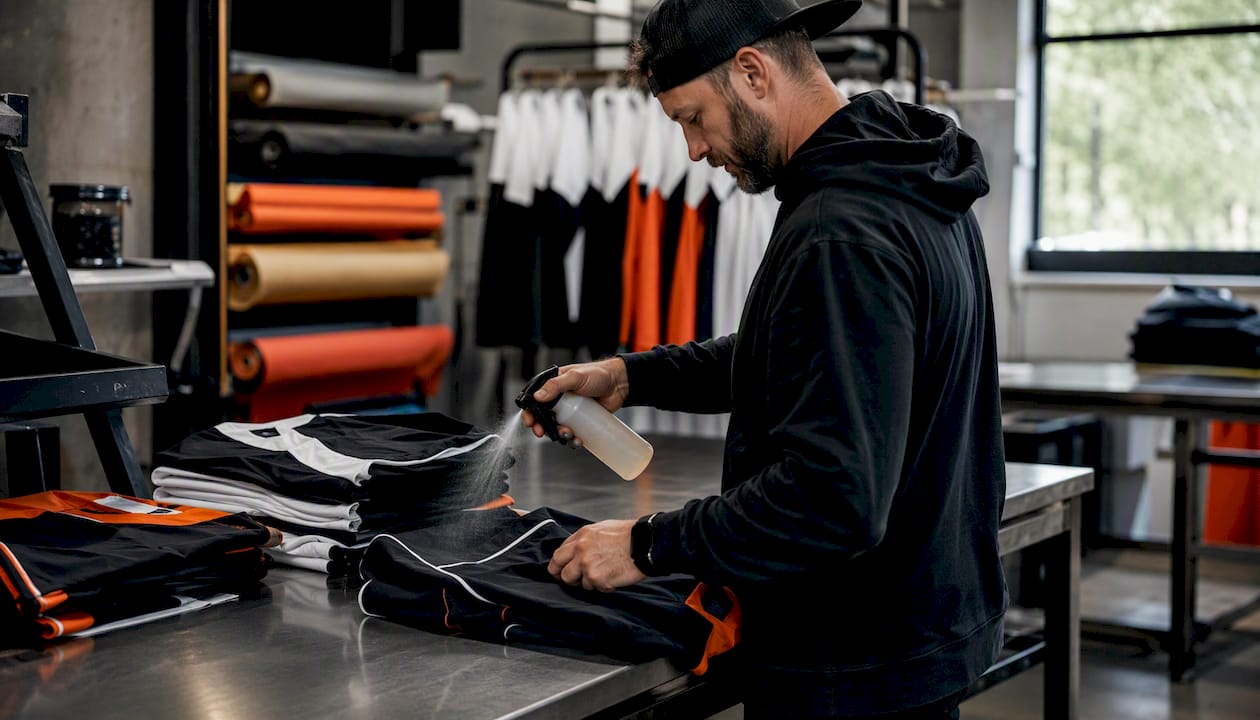
- Foam padding (shin guards, shoulder pads) — hand wash in a tub with warm water and a small amount of dish soap. Rinse thoroughly and air dry flat for at least 24 hours before storing.
- Helmets — surface clean only. Use a damp cloth and mild disinfectant spray on the shell and interior liner. Never submerge, never machine wash, never use bleach near the foam.
For items with heavy odor or mold, a local dry cleaner that handles athletic wear is worth the cost, especially for keepsake jerseys you want to preserve. Repair triage is straightforward: fix loose seams, replace missing snaps, and re-stitch detached numbers if the base fabric is sound. Discard anything with structural safety failures, period.
Pro Tip: For shared items going back into circulation or up for sale, a quick spray of a sports-specific antimicrobial (like Lysol Laundry Sanitizer added to the wash cycle) cuts odor and reduces the liability of passing along bacteria. It costs under $10 and takes 30 seconds.
Which storage method actually protects your gear
Short-term and long-term storage need different approaches. Throwing everything into a single garbage bag works for a week; it destroys gear over a summer.
Storage options compared:
| Method | Best For | Pros | Cons |
|---|---|---|---|
| Clear polypropylene bins with lids | Bulk apparel, helmets, bags | Stackable, visible contents, pest-resistant | Takes floor space, not airtight |
| Vacuum-seal bags | Off-season apparel, hoodies, jerseys | Space-saving, moisture-resistant | Can crease fabric; not for structured items |
| Garment bags (fabric) | Keepsake jerseys, autographed items | Breathable, prevents dust, display-ready | Not stackable, needs hanging space |
| Hanging racks | Active-use items, items awaiting sale | Easy access, no creasing | Requires dedicated space, no pest protection |
| Shelving units | Mixed gear, helmets, bags | Organized, accessible | Open shelving collects dust |
If you’re storing gear in a garage or basement, add a small dehumidifier or a few moisture-absorbing packets (silica gel or DampRid) to each bin. Cedar blocks or sachets deter moths without the chemical residue of mothballs. Keep storage off concrete floors; moisture wicks up through cardboard and fabric.
For keepsakes specifically: wrap autographed jerseys in acid-free tissue paper before placing them in a garment bag or flat display box. Acid-free materials prevent yellowing and ink degradation over years. Label the outside of every bin with the contents, season year, and condition so you’re not opening six boxes to find one item.
Budget tip: ask parents to donate clean plastic bins from home before buying new ones. Most families have surplus storage containers after spring cleaning.
How to choose the right exit path for each item
Every leftover item needs a decision, and pre-defining exit strategies before the season ends prevents the panic clearance that costs teams money. There are five standard paths: markdown, bundle, carry forward, liquidate, or donate.
Decision questions to ask for each item:
- Is it personalized with a specific player’s name or number? If yes, it can only go to that player or be discarded.
- What condition is it in? New or Good items have resale value. Repair Needed items need a cost-benefit check.
- Is there realistic demand? A generic hoodie sells. A jersey with a graduated player’s name probably doesn’t.
- Does it create any liability? Damaged safety gear gets discarded, not donated.
Exit paths and timing:
- Carry forward — core basics (plain hoodies, training tees, unbranded gear) in good condition. Store correctly and reuse next season.
- Markdown and sell — list within 2–6 weeks of season end, while interest is still warm. Use team group chats, local Facebook groups, or a team swap event. SKU-level sell-through tracking lets you start incremental price drops early rather than slashing everything at once.
- Bundle — pair a hoodie with a tee at a reduced combined price to move slow inventory faster. A $35 hoodie and a $15 tee bundled at $40 moves both items instead of neither.
- Donate — if items are unsold after 8 weeks, contact local schools, youth programs, or organizations like Leveling the Playing Field, which redistributes sports equipment to underserved youth.
- Liquidate — last resort for large volumes. Off-price channels or a bulk donation to a thrift store clears space without generating cash, but it clears the books.
FP&A frameworks weigh carrying costs against price elasticity when timing markdowns. For a team manager, the practical takeaway is simple: every week an item sits unsold costs you storage space and attention. Set a hard deadline and stick to it.
Why on-demand team stores prevent this problem next season
The cleanest solution to end-of-season inventory is producing nothing until someone orders it. On-demand production models eliminate leftover stock entirely because items are made only after purchase, with typical lead times of 5–10 business days for team apparel.
A seasonal kit drop works like this: the club opens an online store for a set window (two to three weeks), parents and players order their own sizes, the vendor produces only what was ordered, and nothing sits in a storage bin at season’s end. Late joiners and replacement orders get handled the same way, on demand, without a coach having to guess sizes or front bulk costs.
Per-team branded stores let players order their own sizes while the club retains margin and avoids a single bulk ordering point entirely.
For clubs managing multiple teams, real-time inventory synchronization across locations materially improves clearance outcomes by enabling targeted transfers and consistent markdown execution when physical stock does exist.
Vendor negotiation tips if you do order in bulk:
- Ask for a limited return window (even 10–15% of the order) on undecorated items
- Request conditional reorders rather than a full upfront commitment
- Negotiate a short unsold-return window before decoration is applied
Pro Tip: Pilot an on-demand store with one team before rolling it out club-wide. Lock branding and deadlines, collect sizes up front, and build your lead time around the slowest custom item. One successful pilot makes the case to the whole club without requiring a policy change.
A custom team store reduces coach workload significantly when branding, size collection, and one clear ordering deadline are finalized before launch.
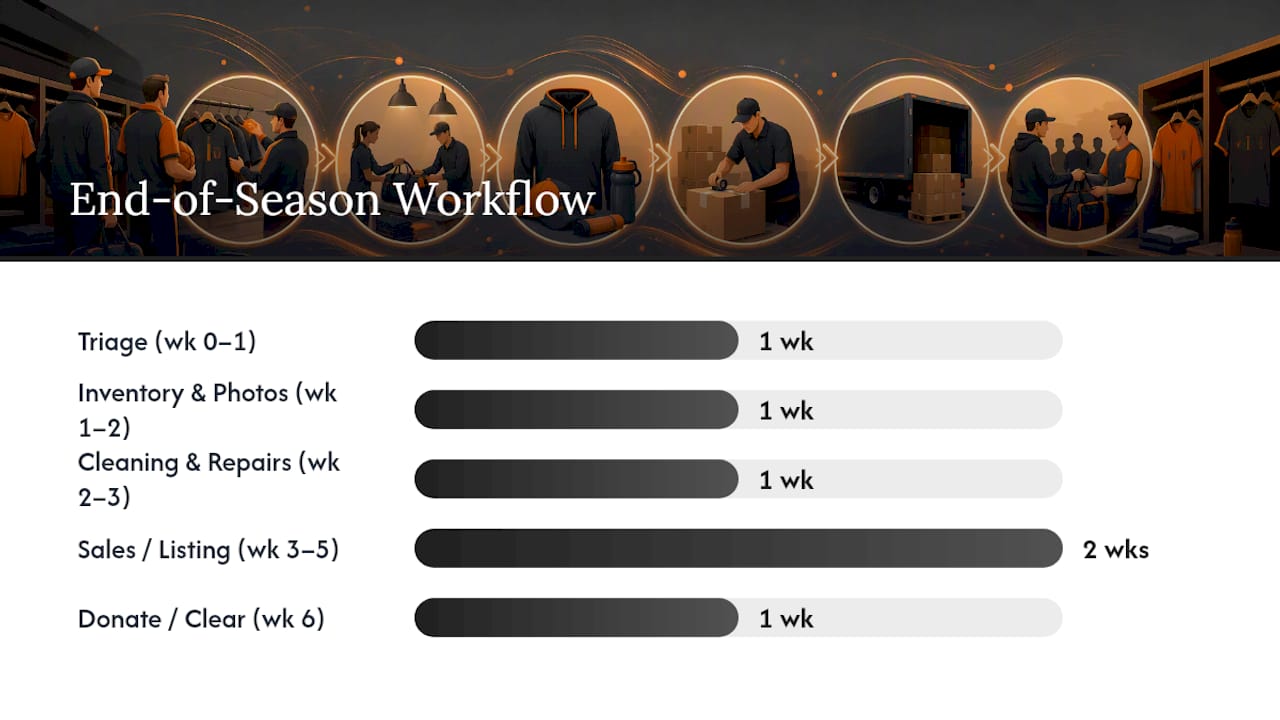
Your 6-week end-of-season workflow
Assign each task to a named person before the season ends. A plan with no owner is just a list.
- Week 0–1: Triage. Coach and one parent rep sort all gear using the four-pile system. Trash goes out immediately. Repair items get tagged.
- Week 1–2: Inventory and photos. Parent volunteer photographs every Sell/Donate item. Treasurer or manager enters data into the shared Google Sheet. Every item gets a condition rating and a suggested price.
- Week 2–3: Cleaning and repairs. Volunteer cleaners handle washing. Simple repairs (seams, snaps) go to a parent with a sewing kit or a local tailor. Items that need professional cleaning get dropped off.
- Week 3–5: Sales event or listing. Post items in the team group chat and local Facebook groups. Run a one-day team swap event if volume justifies it. Collect payment via Venmo, Zelle, or cash with a written receipt.
- Week 6: Donate or clear remainder. Any unsold items go to a designated charity or school program. Nothing carries past week 6 without a deliberate carry-forward decision logged in the spreadsheet.
For a small club (one or two teams), one parent rep can manage the entire workflow. For larger clubs, split responsibilities: coach owns triage, treasurer owns pricing, parent volunteers own cleaning and photos, and a communications lead handles outreach. A spirit wear fundraiser can also convert leftover fan apparel into revenue rather than a storage problem.
For the team sale event itself: use a community center, school gym, or rink lobby. Price items with masking tape labels. Accept at least two digital payment methods. Send a reminder to the full parent group 48 hours before and again the morning of the event.
What most coaches get wrong about end-of-season gear
The most common mistake is waiting. A coach finishes the last game, everyone disperses, and the gear sits in a storage room for three months while the window for selling it at a fair price closes. By the time anyone acts, the items are wrinkled, odor-set, and the team’s attention has moved to next season’s tryouts.
The second mistake is guessing sizes. Ordering 10 extra larges “just in case” is how you end up with a bin of unsold hoodies. The fix is collecting sizes before ordering, not after.
The third is unclear deadlines. “We’ll figure out the leftover jerseys eventually” means they never get figured out. A hard date on the calendar, communicated to parents in writing, is the only thing that creates urgency.
Three lessons that actually stick:
- Start triage within 72 hours of the final game, not after the awards banquet
- Communicate disposition plans to parents in the same message as the season wrap-up, so they know what’s happening and can claim items or contribute to the sale
- For keepsakes, document provenance in writing: who wore it, what season, what number. An autographed jersey with a handwritten note on acid-free card stock inside the garment bag is worth preserving. One without context is just an old jersey. See the keepsake apparel guide for specific preservation ideas.
How Rnkapparel supports your team store and reorder needs
When you’re ready to prevent next season’s inventory problem at the source, Rnkapparel offers custom hockey hoodies, graphic tees, and a full range of team apparel built for on-demand and bulk ordering, with options for team logos, player names, and numbers. No guessing sizes, no leftover bins.
Before reaching out, prepare: your finalized logo files (vector preferred), a size summary from your roster, your desired personalization rules (names, numbers, or logo only), and a rough budget per player. That prep cuts quote turnaround time significantly. The hockey team online store setup guide walks through exactly what to have ready before launch. Visit Rnkapparel to browse collections and start your team’s custom order today.
Sources
The sources below back the frameworks and recommendations in this guide.
- Teamwear & Spiritwear | Brikl — On-Demand Branded Gear for Teams & Schools | Brikl
- End-of-Season Exit Strategies: Mark Down, Bundle, Carry Forward, or Liquidate? | RetailNorthstar
- A Guide for Managing End-of-Season Sale Across 50+ Stores
Templates: Use the eight-column Google Sheets template described in the inventory section above as your master file. Copy the 6-week workflow table into a second tab and assign owner names to each row before sharing with your team.
Recommended
- Hockey Team Gifts: Top Picks for Players and Coaches in 2026 – RNK Apparel Co.
- Personalized Hockey Coach Gift Guide: Performance Gear They’ll Actually Wear (2026) – RNK Apparel Co.
- End of Season Hockey Keepsake Apparel: Top Picks – RNK Apparel Co.
- How Team Apparel Orders Are Processed: A Coach’s Guide – RNK Apparel Co.
